Outline: Complete Online Matrimonial Website System Script in PHP
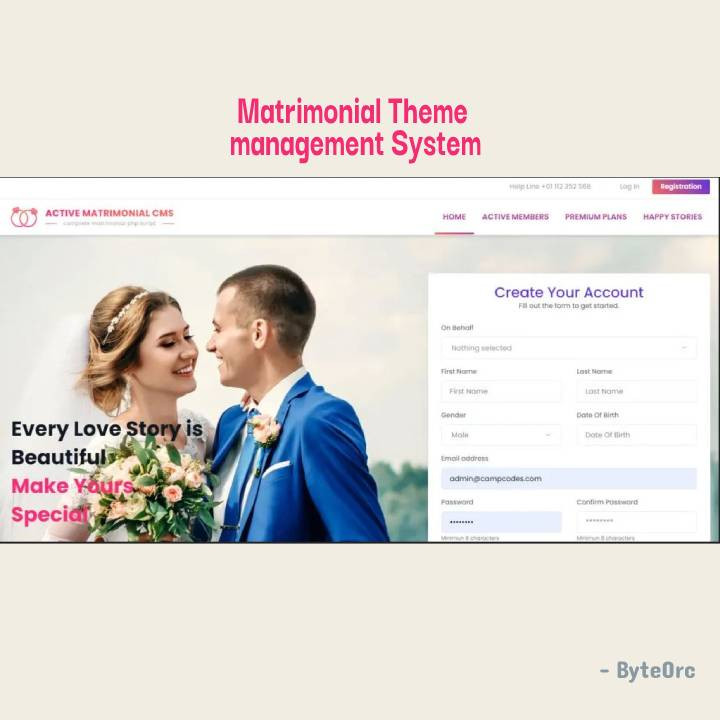
The top matrimony script for running a marriage agency is Online Matrimonial Website System Script in PHP and MySQL Project Free Download. It is a marriage script with all the features. With administration, finances, management of the bride and groom’s profiles, SMS Gateways, Payment Gateways, and SEO, you may run your matrimonial business.
The matchmaking market has changed thanks to script-based matrimony websites. It’s a massive, never-ending race to find the right matches. Utilize the internet to the fullest extent possible for your matchmaking endeavors using Matrimonial Clone Open Source. The most prosperous company will turn out to be this one. Matrimonial Script has been used by millions of people around the globe to find their soul mate.
Unlike any other industry, matrimonial script has the most specialized audience on the earth. People from many different backgrounds, faiths, social classes, and cultures can use the Matrimonial Script platform. The Matrimonial PHP Script can be customized for a specific caste or cultural group of people.
Core Features: Complete Online Matrimonial Website System Script in PHP
- Responsive design
- Powerful admin dashboard
- Dynamic Color Theme
- Dynamic Frontend Design
- Staff Role created by admin
- Dynamic Subscription System
- Premium Plans
- Premium Membership
- Free membership
- Multiple Payment Option
- Quick Homepage Search
- Auto Matchmaking
- Express Interest
- Personal Messaging
- Ignore Member
- Create Shortlist
- Personal Photo Gallery
- Smart communication
- Dynamic Profile System
- Quick Profile Editing
- Happy story upload
- Dynamic subscription system
Script Comes With
- Excellent customer service and quick response times.
- Fix any errors or broken links.
- Help with installation and setup.
- Preparation statements are used in a secure database to prevent SQL Injection.
- Defends against CSRF assaults.
- Use an HTML filter to stop XSS attacks.
- Built utilizing the most recent version of LARAVEL.
- The encryption of passwords by encrypting using bcrypt.
- To use it, you should need GMP Extension.
Server Requirements
- PHP =7.3
- MySQL 5.6+
- mod_rewrite Apache
- BCMath PHP Extension
- Ctype PHP Extension
- JSON PHP Extension
- Mbstring PHP Extension
- OpenSSL PHP Extension
- PDO PHP Extension
- Tokenizer PHP Extension
- XML PHP Extension
- ZipArchive Extension
Installation Guide: Complete Online Matrimonial Website System
- On your computer, unzip the .zip file you obtained by clicking the download button below.
- To run the script, upload the Install.zip file to your server’s public_html directory or any other desired location.
- In that directory, unzip the file.
- From the MySQL database on your server, create a new database.
- Make a DB user for the database and connect the user to the database.
- Visit your site’s URL; http://yoursite.com, you’ll be taken directly to the installation.
- To begin the installation process, click it.
- The Checking File Permission screen will appear. Click on “Go” on to the following stage if everything is in order.
- You must now provide the database host, database name, database username, and password before clicking continue.
- The SQL file has to be imported right now.
- Fill out the shop’s information now, then click Continue.
- Select Login to the Admin Panel from the Go to Home menu.
How to update to the latest Version?
- Extract the DuraScripts file you downloaded.
- You will find a “updates.zip”-named zip folder there. Upload it to the server’s root directory, where your older version is now running. By clicking “Extract here,” the updates.zip file can be opened.
- Reload the home page after that, then select “Update Now.”
- The system will be updated immediately.
- Check out the Active eCommerce CMS’s most recent version.
Related Questions for Installation
1: Do I need VPS or Dedicated Server?
R: No, you can use a shared server/hosting for the installation.
2: Which hosting provider do you believe will be the best?
R: Any hosting provider who provides CPanel Hosting but I use ZainHosting.
3: What is CPanel?
R: The server’s control panel is called CPanel. You can Check More Here
4: What if I don’t have a CPanel?
R: There’s no need to fear; it works with all control panels, although Cpanel is the easiest to manage, thus I recommend Cpanel-based hosting.
CRON Settings
Automate your system with Cron
In your control panel, set the General cron to run once per day. Based on the expiration dates and automation settings, General Cron will generate and send invoices to your clients.
The Email Piping Cron can be set to run as often as you like. This will automatically create support tickets and import emails from customers.
Only properly configured Email Piping Settings will allow for email piping to function.
SETTING UP CRON IN CPANEL ILLUSTRATION:
How To Edit Code?
When the product is installed on your server, two folders and a few files will be available for you.
All of our assets, including CSS, JS, and Images, are kept in the folder “assets.” So, look in this folder if you want to edit or change any assets.
The Laravel Core is kept in the “core” folder.
On this project, we maintain Laravel’s MVC structure.
All Routes (URLs) are in “core/routes/web.php.” The ControllerName@FunctionName is located here.
The “core/app” folder contains all models.
“core/app/Http” This folder contains all controllers. If any functionality has to be changed, you are free to do so.
“core/resources/views” Here, you have the complete HTML Structure. If you need to edit anything in HTML, you can do whatever you want.
Template HTML Structure
The HTML template incorporates proper HTML5 tags and Latest Bootstrap v4. This theme has a responsive design and a Support column with 12 columns. The content area contains predefined classes and all of the information is nested within those classes.
CSS Files and Structure
This theme mostly uses three CSS files. The first one is called bootstrap.css, the second is called style.css and it’s for this template. The third one is called responsive.css and it manages responsive layouts.
Used CSS File For Various Purposes:
- bootstrap.min.css (CSS Folder).
- font-awesome.min.css (CSS Folder).
- jquery.circliful.css (SASS Folder).
- font-awesome.min.css (CSS Folder).
- slick.css (CSS Folder).
- swiper.min.css (CSS Folder).
- style.css (CSS Folder).
- responsive.css (CSS Folder).
Simply locate the appropriate title in the CSS file and scroll down until you locate the proper style that needs to be modified if you want to edit a specific section of the website.
How to Manage Members?
- Log in to Admin Panel
- Proceed to Member – Free/Premium Members (Choose the type of member to manage).
- Add a new member by clicking on the “Add New Member” button.
- View and Edit members information from this section.
- The administrator will have the ability to approve members if the Member Approval option is selected.
How to add bulk Members?
- Log in to Admin Panel.
- Navigate to Member – Add Bulk Member.
- Use the downloaded sample file and input bulk data.
- Upload and Submit the inputted data.
- The following should be in numerical ID: Gender, On Behalf ID, and Package ID.
- Male ID = 1 and female ID = 2, according to gender numerical IDs.
- Get the On Behalf ID and Package ID by downloading the PDF.
- Before the phone number, add the country code.
How to restore Deleted Members?
- Log in to the Admin Panel.
- Navigate to Members – Deleted Members.
- Click the “Restore” button on the necessary member from the list to bring back deleted members.
How to See Reported Profiles?
- Log in to Admin Panel.
- Proceed to Members – Reported Members.
- You can view the reasons for the Profile report and remove it.
How to manage Members’ Profile Attributes?
- Log in to Admin Panel.
- Navigate to Members – Profile Attributes.
- You can add, modify, and delete member profile attributes from this section.
How to manage Members Profile sections?
- Log in to Admin Panel.
- Proceed to Members – Profile Section.
- The profile parts can be enabled or disabled. The users will only see the elements of your profile that you have enabled.
How to manage Premium Packages?
- Log in to Admin Panel.
- Navigate to Members – Premium Packages.
- To add a new package, click the “Add New Package” button.
- You must fill out several fields before you can add a package, including the ones for the package name, price, photo, number of expressed interests, number of uploaded photos, package duration, and whether or not to enable auto-profile matching.
- Lastly, to edit the chosen package, click “Submit.”
- From this part, you may also Edit and Delete packages (without the default package).
Add Cron Job:
To check the validity of the members’ package, you must add a cron job.
- Log onto your Cpanel and look for the Cron Jobs option to set a cron job.
- Click on Cron Jobs.
- Create a fresh Cron Job.
- Choose the Everyday time frame.
- wget -O – http://your-domain-name.com/check_for_package_invalid should be set as the command.
How to manage Manual Package Payments?
- Log in to Admin Panel.
- Proceed to Package Payments.
- A View Details button is included in the manual package.
- If the bill is available, you can download a copy of it and view payment information.
- Select the Accept Payment option if you want to accept the payment.
- As soon as the payment is accepted, the payment status is changed to “Paid,” and the member receives the requested package.
How to manage Happy Stories?
- Log in to Admin Panel.
- Navigate to Happy Stories.
- Stories can be edited, viewed, and approved by the admin.
How to send a Newsletter?
- Log in to Admin Panel.
- Proceed to Marketing – Newsletter.
- Choose user’s email.
- Input newsletter subject.
- Write the article. If necessary, the administrator may include a table, link, image, video, or any other text formatting in this text section.
- Press the “send” button.
How to Upload Files and manage Uploaded Files?
- Log in to Admin Panel.
- Proceed to Uploaded Files.
- To upload new files, select the “Upload New File” button located in the top right corner. Several files can be uploaded at once.
- To view the File Details, file Download, Copy Link, and Delete options, click on the dot at the top of the image.
Login Details
Username: admin
Password: admin


